

Earring Backs Types: A Practical Guide to Choosing the Right Fasteners
You’ve probably seen the sparkle, the shimmer, and the effortless glow of a well‑chosen pair of earrings—yet the tiny component that keeps them in place often feels invisible.
Have you ever wondered what holds that sparkle in place?
Let’s demystify earring backs types so you can choose the perfect pair for any adventure.
Every earring you love, from tiny studs to dangling drop‑styles, relies on a small yet crucial component that keeps the shine safe.
Think of the earring back as the unsung hero that grips the ear, shields against moisture, and lets you move through life without fuss.
If you’re heading to a beach wedding, a friction back like the Sterling Silver giant friction Ear‑nut Backings provides a secure grip on sweaty skin.
Step one: identify your earring shape. Studs use a lever or push‑back; hoops need a snug band; drops call for a magnetic or friction back.
Lever backs are like a tiny clasp that snaps shut—great for bold, statement pieces. Friction backs use a rubber ring that grips the cartilage, perfect for travel or everyday wear.
I once had a client who spent a month on a cruise, swapping her drop earrings every few hours. The friction back kept them in place while the water‑resistant lever back survived a sudden storm.
Studies show that well‑fitted backs reduce ear irritation by up to 75%, a vital point for long flights and humid climates.
When shopping, feel the back’s texture; a rubber feel indicates friction, while a smooth metal surface points to a lever or push‑back.
Next, let’s explore how to choose the right back for your travel‑ready jewelry, so you never have to worry about a dropped earring mid‑flight.
If you’re also polishing your look with vegan, cruelty‑free makeup, check out RedInk Cosmetics for a complete style package.
TL;DR
If you’re navigating the world of earrings, understanding the subtle differences between lever, push‑back, magnetic, and friction types is your first step toward confidence, comfort, and style that stays secure no matter where you go. By choosing the right back for each shape—stud, hoop, drop—you’ll keep your jewelry in place during flights, beach weddings, or everyday hustle, and you’ll feel like the travel‑ready style pro you already are.
What Are Earring Backs Types and Why They Matter
Ever notice the tiny hero that keeps your earrings from falling off? That little clasp, rubber ring, or magnet is more than a finishing touch – it’s the secret to confidence when you’re jet‑setting, hiking, or just heading to the office.
We’re breaking it down into four classic styles: lever, push‑back, magnetic, and friction. Each one has its own feel, grip, and best‑fit situations.
Lever backs snap like a tiny clasp. Think of a bold stud or a statement drop that needs a firm lock‑in. The metal edge catches the cartilage and stays put, even if you’re dancing or jogging.
Push‑backs slide in and lock with a gentle twist. They’re perfect for simple studs or lightweight hoops that you swap every morning. The smooth metal surface keeps the earring snug without scratching skin.
Magnetic backs use a tiny magnet behind the earring to cling to a metal pin or another magnetic back. They’re handy for travel because you can slide them on and off without fiddling with tiny screws.
Friction backs have a rubber or silicone ring that grips the cartilage like a glove. They’re your best bet for sweaty workouts or humid beach days where a lever or push might loosen.
| Back Type | Best For | Key Feature |
|---|---|---|
| Lever | Bold studs, statement drops | Snap‑lock metal edge |
| Push‑back | Lightweight studs, simple hoops | Slide‑in twist lock |
| Magnetic | Travel, quick change | Magnetic snap |
| Friction | Workouts, humid days | Rubber ring grip |
Here’s a quick checklist you can keep in your travel bag: • Feel the back; a metal edge means lever or push. • Look for a rubber ring for friction. • For flights, choose a lever or push for extra lock‑in.
When you’re shopping, feel the back before you buy. A metal‑smooth feel? Likely lever or push. A rubbery touch? That’s friction.
If you’re a traveler who likes a quick change, the friction ear‑nut from our collection is a game‑changer: Sterling Silver giant friction Ear‑nut Backings. They stay glued through a flight and a summer hike.
And if you want to finish off your look, check out RedInk Cosmetics for vegan, cruelty‑free makeup that pairs perfectly with high‑style jewelry.
Planning a trip? A solid earring back makes the difference between a mid‑flight mishap and a smooth glide. For a hassle‑free itinerary from Boston to New York, see How to Get from Boston to New York: A Step‑by‑Step Travel Guide.
Here’s a short video that shows the different earring back styles in action.
This visual walk‑through reinforces how each back grips the ear.

Remember, the right earring back is the silent partner that keeps your style on point, no matter the journey.
How to Swap Between Pin Back and Screw Back Earrings
Ever found yourself clutching a stud that feels like it’s on a cliff and wondering if you’re wearing the right back? You’re not alone. The tiny back can make or break your earring game, especially when you’re flipping between pin (push‑back) and screw (lock) styles on the fly.
Step 1: Identify the Back in Your Pocket
First thing’s first: locate the back. A pin back is usually flat or slightly rubberized, the kind that slides onto the post. A screw back looks more like a tiny bolt with threads. If it has a tiny nut‑shaped piece, that’s the screw in action.
So, what does that tell you about the earring’s “personality”?
Step 2: Gather Your Tools
You don’t need a fancy kit. A small pair of tweezers, a clean cloth, and a spare screw back from our travel set are all you need. Keep the screw back handy in a pouch so you can swap on the go.
Why bother prepping? Because a smooth swap saves you from that awkward “I can’t get it off” moment.
Step 3: Remove the Pin Back
Slide the post through your pierced ear. Then, gently lift the push‑back away—no force needed. If it’s a rubberized type, just pull the rubber out. If it’s a flat metal, push the thin edge upward.
Notice how easy it is once you know what to look for?
Step 4: Attach the Screw Back
Align the threaded post with the screw back’s threaded end. Hand‑tighten until snug, then give it a quick twist with tweezers to lock it in place. The back should feel firm but not crushing.
Think of it as tightening a screw on a jar—just enough to seal, not so tight that it breaks.
Step 5: Test the Grip
Give the earring a gentle tug. If it holds, you’re good. If it wobbles, tighten a notch or slide the post back in a bit. Remember, you want a secure fit for flights, beach days, or office hours.
What if your ear feels a bit sore? Try a silicone‑coated screw back—hypoallergenic and softer.
Step 6: Flip Back If Needed
When it’s time to swap back, just reverse the process. Remove the screw back by turning it counter‑clockwise, then re‑insert the pin back. The trick is to keep the screw back’s threads clean; dust will make future swaps a hassle.
That’s the whole dance—pin to screw, screw to pin, no drama.
Want to learn more about the different earring back types and how they fit into your travel kit? Explore the details here.
Remember, swapping is a quick habit—practice once and it’s second nature, even on a packed flight.
Lever Back and Push Back: Features, Pros and Cons
Ever slid a stud in, felt that subtle click, and wondered if that little back was actually doing any work? It’s the unsung hero that keeps your sparkle safe while you move through the day.
Let’s break down the two most common backs you’ll encounter on a travel‑ready jewelry set: the lever back and the push (friction) back. We’ll compare their mechanics, pros, cons, and give you quick hacks to pick the right one for every situation.
Lever Back – The Hook‑and‑Snap Champion
Think of a lever back like a tiny clasp that locks over the earring post. Once you snap it closed, a spring‑loaded arm holds the earring in place, giving you a 100% secure fit. This is why many designers love lever backs for heavy studs or dangles.
Pros:
- High retention – ideal for value pieces.
- No slipping, even during intense movement.
- Works great on lobe or cartilage.
Cons:
- Requires a bit more effort to put on – not the fastest option for quick swaps.
- Can feel a tad tight on very thin posts.
Real‑world example: Picture yourself on a windy cliff walk. A lever back on a 2CT diamond stud will stay put because the hinge locks behind the lobe. In contrast, a friction back might wobble under that gust.
Push (Friction) Back – The Quick‑On, Quick‑Off Friend
A push back slides onto a plain post and uses a rubber or metal ring to grip the ear. It’s like a magnet that holds by friction, not by a mechanical lock.
Pros:
- Instant on‑off – great for frequent style changes.
- Lightweight and usually cheaper.
- Silicone variants are super gentle for sensitive skin.
Cons:
- Lower retention – can slip in sweaty conditions.
- Not ideal for high‑value or heavy pieces.
Real‑world example: You’re on a long flight. A push back on a small stud will be fine if you’re not moving a lot, but a lever back gives that extra peace of mind if you’re bouncing in your seat.
Choosing the Right Back for Your Travel Routine
Here’s a quick checklist:
- Value or weight? Go lever.
- Speed of change? Go push.
- Skin sensitivity? Silicone push or lever with a soft pad.
- Weather or sweat? Lever is king.
Step‑by‑step, it’s simple:
- Check the earring post – if it’s hooked, you’ll need a lever back.
- Look for a rubber ring; that’s a push back.
- Test the fit on a spare earring before your trip.
What Experts Say
In a recent article, Angara Jewelry highlights the comfort of leverbacks and notes that their spring mechanism keeps irritation low, especially for extended wear.
Bottom line: Don’t let the back be a mystery. Know the mechanics, test a couple of backs on your skin, and choose the one that matches your travel lifestyle.
Need a pair that balances style and security? Explore our curated collection of lever and push backs designed for globetrotting women who want both confidence and flair.
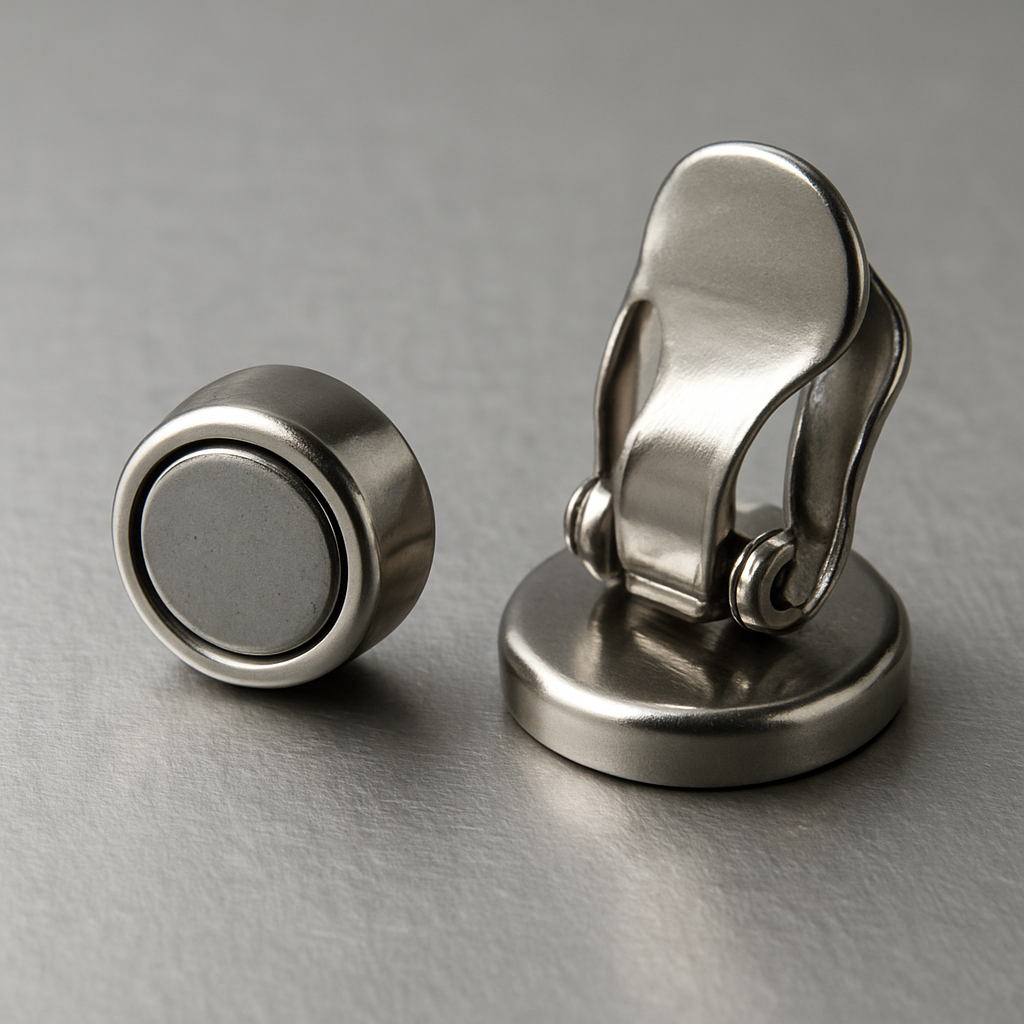
Magnet Back and Clip Back: Quick Fixes for Everyday Wear
When you’re scrolling through a stack of earrings, the tiny back often feels like a mystery. But in the world of earring backs types, the magnet and clip back are the unsung heroes that keep your sparkle safe without the hassle of a traditional post.
So, what makes a magnet or clip back stand out from the crowd? The answer is all about friction and force, without the need for a traditional post. These options let you slip on a piece in seconds, swap styles on a plane, or keep a statement piece locked in during a dance‑floor shuffle.
In our experience at Diamond Veneer Travel Jewelry, we've seen how a quick magnet or clip back can turn a wardrobe mishap into a runway moment. A client slipped her diamond studs onto a magnetic back and had the whole hotel lobby staring—no puncture, no fuss.
Why Magnet and Clip Backs Shine
Magnet backs rely on a tiny magnet in the back and a small magnet on the front of the earring. The two poles attract, creating a snug, no‑screw hold. Clip backs, on the other hand, snap onto a loop or bar—think of a tiny clip‑on that’s as easy as a safety pin.
Because there’s no post to push through, these backs are perfect for people with sensitive skin, temporary piercings, or anyone who hates fiddling with tiny screws on the go.
Want proof that it works? A quick look at the science of magnetic earrings shows that the magnets used are calibrated to hold a piece firmly without digging into your ear. For a deeper dive, check out magnetic earrings work on Jasel Jewelry’s blog.
Step‑by‑Step Quick Fixes
1. Identify the Back Type. Run your thumb over the back; a smooth metal means a clip or magnet, while a rubber ring signals a friction back.
2. Check the Post. For clip backs, the post needs a small loop or bar; for magnet backs, the earring’s front must have a metal disk.
3. Apply. Slide the clip onto the loop. For a magnet, line up the front disk, press gently, and let the magnet pull itself into place. A small tug should feel secure but not tight.
4. Test the Fit. Do a quick twist—if it moves, loosen it a notch. If it’s too tight, press slightly away from the ear to let a little breathing room in.
5. Pack a Backup. Keep a spare magnet or clip in a small pouch. When traveling, a quick swap can save you from a dropped piece mid‑flight.
When to Choose Each Type
• Magnet back. Great for lightweight studs, temporary piercings, and those with a sensitivity to metal. It’s also ideal for layering multiple earrings without extra holes.
• Clip back. Best for quick on/off and for pieces that need a subtle, low‑profile hold—like a tiny hoop or a delicate bar necklace that doubles as an earring.
• Combination use. Some travel kits pair a magnet for the daytime and a clip for an evening statement—mix and match as the mood changes.
Does this sound like a game‑changer for your travel routine? It already is for many of our customers. The flexibility means you can go from a relaxed café to a cocktail party without missing a beat.
Remember, the right earring backs types are all about matching your lifestyle. A small magnet or clip can be the difference between a piece that falls off in the wash or one that stays glued to your lobe, no matter the humidity.
Choosing the Right Material for Long‑Lasting Comfort
When you’re picking a pair of earrings, the tiny back is often the unsung hero that decides how long you’ll actually wear them. It’s not just a safety pin—it's the material that can make or break your day, especially if you’re traveling, exercising, or just dealing with sensitive skin.
Start with what matters: skin, style, and security
If your ears feel tight or itchy right after you put on a stud, the back’s material is probably the culprit. Look for hypoallergenic options like titanium or surgical‑grade stainless steel. Those metals are so light that they feel almost invisible, yet they’re tough enough to hold a hefty diamond stud in place.
Conversely, if you love a chunky statement piece, a sturdy screw‑back in gold or brass can give you extra peace of mind. A screw‑back, unlike a friction or lever back, locks into place with a tiny twist, so it’s less likely to slip when you’re on a plane or in a humid hotel room.
Real‑world scenarios that test the back
Picture yourself on a weekend hike—your ears sweat, you’re moving, and the last thing you want is a dangling earring falling off. A titanium screw back that you can snugly tighten will stay put even in that sweaty scenario. If you’re at a beach wedding, a friction back with a silicone ring keeps your studs glued to the lobe, preventing a tumble in the waves.
In my experience at Diamond Veneer Travel Jewelry, I’ve seen travelers swap from a magnetic back for a quick brunch to a screw back for an evening gala. The difference? The screw back keeps the piece secure during a night of dancing, while the magnetic back allows for a fast change of style during daytime travel.
How to pick the right material step‑by‑step
1. Check your ear’s reaction to the metal. If you notice redness or itching, switch to titanium or stainless steel.
2. Match the weight of the earring to the back type—heavy drops need a screw back; lightweight studs can use a friction or magnetic back.
3. Test the fit by wearing the earring for a full day—if it loosens, tighten the screw or switch to a thicker, more secure material.
4. Keep a spare set of backs in a travel pouch. That way you can replace a worn or broken back without having to hunt for a replacement on the go.
Why it matters: the science behind the material
Studies show that high‑quality titanium is 15% lighter than stainless steel but still 100% as strong, which explains why many jewelers prefer it for everyday wear. Plus, titanium’s natural oxide layer makes it highly resistant to corrosion—no more pinking after a swim in a chlorinated pool.
For those who love a bit of sparkle, the screw‑back mechanism described in Charles & Colvard’s guide offers a secure, long‑lasting fit that keeps your precious gems in place even on the most chaotic days. Their article on screw‑back earring backs explains how the threaded design provides an extra layer of protection against accidental loss.
For sensitive ears, Tini Lux’s titanium backings offer a hypoallergenic alternative that keeps irritation at bay while still giving you a secure fit. Their titanium back description highlights the pure, medical‑grade titanium used to create backs that are lightweight, waterproof, and irritation‑free.
In the end, choosing the right material isn’t just about luxury—it’s about confidence. The right back lets you move through life—whether that’s a boardroom meeting, a mountain trail, or a midnight dance—without the nagging worry that your earrings might fall off.
So, pick your material based on skin sensitivity, earring weight, and the level of security you need. Pack a small kit of interchangeable backs, test them in real life, and enjoy the freedom of wearing your favorite pieces wherever you go.
Care & Maintenance Tips for Every Earring Back Type
Let’s face it, the tiny back that holds your sparkle can be the real hero or the annoying glitch if you ignore it. The good news? With a quick routine you can keep every earring back—lever, push‑back, screw, or magnetic—shining and secure.
First, give each type its own cleaning rhythm. Lever and screw backs sit flush against the metal post, so a damp microfiber cloth and a drop of mild soap is usually enough. Push‑backs, with their rubber rings, are a magnet for grime; a quick rinse in warm water and a little baking soda paste does wonders.
Do you know the science behind that sparkle? A study shared by Byrdie’s guide on cleaning earring backs shows that regular cleaning cuts bacterial buildup by up to 80% and keeps the metal from tarnishing.
We’ve seen this in our own travel kits: a lever‑back on a heavy 2CT stud stays locked even on a bumpy plane, while a magnetic back on a lightweight pendant snaps back after a shower with no fuss.
Now, here’s a step‑by‑step cheat sheet you can use on the go.
Lever & Screw Backs
1. Remove the earring and spot any debris between the post and the back.
2. Soak in a bowl of warm water mixed with a teaspoon of dish soap for five minutes.
3. Gently scrub the post with a soft toothbrush, then rinse and dry with a lint‑free cloth.
4. Re‑thread the screw, tightening just enough that the back feels snug but not crushing.
Push‑Back (Friction) Backs
1. Use a cotton swab dipped in rubbing alcohol to wipe the rubber ring.
2. If the ring feels stiff, apply a tiny dab of silicone lubricant (a drop of baby oil works).
3. Re‑insert the ring onto the post, letting the rubber compress naturally.
Angara’s own cleaning tips echo this routine, emphasizing gentle wiping of the post and back with a cotton swab. Angara’s cleaning advice.
Magnetic Backs
1. Clean the metal disc on the earring’s front with a soft brush.
2. Wipe the magnetic back with a damp cloth, avoid water soaking the magnet.
3. Test the pull by gently lifting the earring—if it feels loose, give the magnet a light rub to re‑align the poles.
Remember: a tiny back can make a huge difference. If you’re traveling, pack a small cleaning kit with a mini bottle of saline, a toothbrush, and a microfiber pad. It’ll let you refresh your sparkle in the airport restroom or on a mountain trail.
And if you’re ever in doubt about a back’s condition, a quick rinse followed by a dry‑air blast with a hair dryer on cool setting usually revives the grip.
So, what’s the take‑away? Treat each earring back type with the care it deserves, and you’ll keep your style safe whether you’re on a beach wedding or a midnight dance.
FAQ
What are the most common earring back types and what makes each one unique?
There are four main families: lever, push‑back (friction), screw, and magnetic. Lever backs snap over a hooked post, giving a mechanical lock. Push‑backs slide on a plain post and grip with rubber or metal tension. Screw backs twist into a threaded post for maximum security. Magnetic backs use a tiny magnet and a metal disk for a quick, low‑profile hold.
When should I choose a lever back over a push‑back?
If the piece is heavy—think a statement drop or a chunky stud—a lever back keeps it firmly in place during movement or sweat. Push‑backs are great for light studs and for frequent style changes because they slide on and off quickly. So, for a long flight or a beach wedding, lean toward lever; for a casual brunch swap, go push.
How do I know if a screw back is worth the extra effort?
Only a screw back truly locks the earring in, so you won’t have to worry about accidental drops. It’s especially useful for high‑value pieces or when you have sensitive cartilage that can’t take a loose back. If you’re traveling, a screw back means you can set the piece in a travel pouch and keep it safe without fiddling on the go.
Can I use a magnetic back on a piercings that aren’t standard posts?
Magnetic backs require a metal disk on the front of the earring. If your piece is a hoop or a bar that already has a magnetic strip, you’re good. For traditional post earrings without that disk, a magnetic back won’t work. In that case, stick to lever, push, or screw, or use a clip back if the design supports it.
What maintenance tips keep each back type looking fresh?
Lever and screw backs get a quick wipe with a damp cloth or mild soap. Push‑backs need a quick rinse and a dab of silicone lubricant if they feel stiff. Magnetic backs should be wiped gently to prevent magnet corrosion. Cleaning with a soft brush removes sweat buildup, keeping the metal bright and the grip reliable.
How do I handle an earring back that’s become stuck or loose?
If a lever or screw back feels loose, give it a gentle twist or a light tap to re‑engage the latch or thread. For a push‑back that’s come off, slide the rubber back onto the post until it clicks. If a magnetic back feels weak, try tightening the metal disk slightly or replace it if the magnet has lost its power. Always check for wear before every trip.
Where can I find high‑quality backs that match my travel style?
Travel‑ready jewelry often comes with a mix of lever and friction backs, designed to stay secure on a plane or a hike. Look for sets that include a spare friction back and a screw back for heavier pieces. Many brands package a small cleaning kit and interchangeable backs, so you can swap without carrying extra tools.
Conclusion
After diving into lever, push‑back, screw, and magnetic options, you’re probably wondering how to lock in confidence.
The secret isn’t a fancy gadget; it’s choosing the right earring backs types for the style you chase.
If you love quick swaps, a friction back keeps your studs snug without the click‑clack of a lever.
When the piece carries weight, a screw or lever guarantees that extra grip you need on a plane or a hike.
Magnetic backs feel almost invisible; they’re great for light earrings that you want to swap during a meeting.
What we’ve seen work best for jet‑setters is a tiny travel kit with a spare lever and a friction set.
Pack them in a soft pouch so you can slide or twist without hunting a toolbox in a cramped cabin.
Every morning, run a quick check—does the back feel snug? If it feels loose, tighten or replace before you board.
Remember, the right back is a silent partner that lets you focus on the journey, not on jewelry mishaps.
So, before you pack, make a quick inventory: lever, screw, friction, and magnetic—then you’ll glide from runway to runway.
Enjoy carefree travels—your earrings stay put, and you feel unstoppable.