

How to Untangle a Necklace Chain: Simple Steps for a Tangle-Free Jewel
We've all been there – you open your jewelry case after a weekend getaway, only to find the delicate chain of your favorite necklace twisted into a knot that looks more like a tiny spider web.
That moment of panic, that quick glance at the tangled mess, and the worry that the precious beads or stones might get scratched – it feels like the universe is testing your patience.
But don't worry, untangling a necklace doesn't have to be a battle of wills. In fact, with a few simple tricks you can coax that chain back into smooth, ready‑to‑wear perfection without a single snag.
Think about it this way: a tangled necklace is just a little puzzle, and you already have the right tools right at your fingertips – a soft cloth, a trusty pin or a butter knife, and a little bit of gentle patience.
First, lay the chain on a flat surface covered with a towel so it doesn't slide around. Then, locate the biggest knot and give it a little wiggle – you’ll often see the loops start to loosen.
Next, use a pin or the tip of a butter knife to gently tease apart the tighter twists. It sounds odd, but the metal tip works like a tiny lever, easing the metal glide smoother without pulling on the delicate links.
Sometimes a drop of baby oil or a dab of conditioner on the knot can work wonders; the slip makes the metal glide smoother. Just be sure to wipe away any residue before you put the necklace back on.
And here's a pro tip we’ve seen work for our traveling clients: roll the chain around a pencil or a straw, then slowly pull the ends. The tension helps the knots unwind in the right direction.
So, if you’ve ever wondered how to untangle a necklace chain without a trip to a jeweler, remember it’s all about staying calm, using the right little helpers, and giving each twist the gentle attention it needs.
Ready to give your favorite piece a fresh start? Let’s dive into the step‑by‑step guide that follows, and you’ll be wearing that necklace again in no time.
TL;DR
Learn how to untangle a necklace chain quickly with gentle tools, simple tricks, and travel‑ready techniques that keep your jewelry pristine.
We walk you through locating the knot, loosening it safely, and using everyday items like a pin or a straw so you can wear your favorite piece again in minutes.
Step 1: Gather Your Tools and Prepare the Chain
Before you even think about pulling at that stubborn knot, take a breath and set the stage. The right tools and a calm mindset are the difference between a quick fix and a broken link. Trust me, you don’t want to be the person who has to replace a delicate pendant because you grabbed the wrong utensil.
What’s in your toolbox?
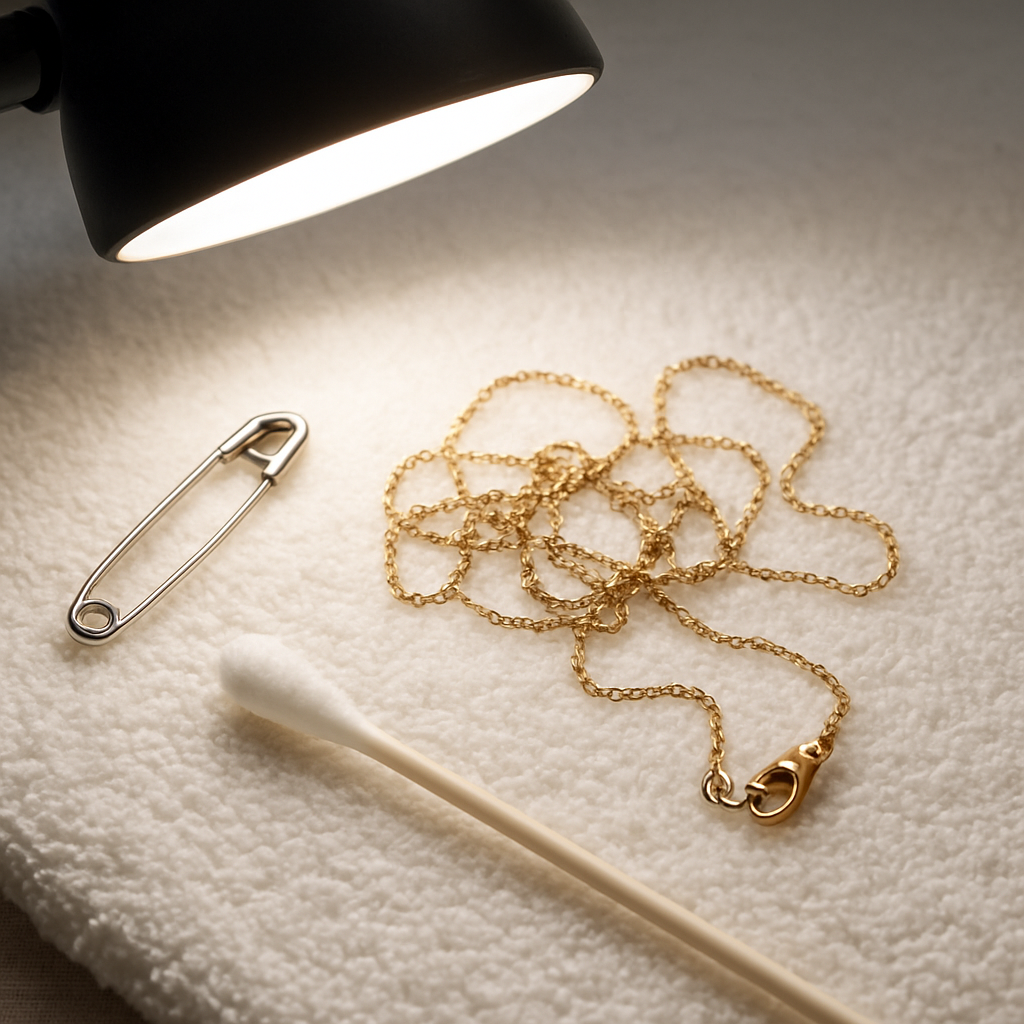
Here’s a quick checklist you can keep in your travel vanity or at your nightstand:
- A soft, lint‑free cloth – it prevents scratches while you work.
- A fine‑point safety pin, a sewing needle, or a tiny paper clip – these act like miniature levers.
- A small bottle of baby oil or a dab of olive oil – the slip agent that lets metal glide.
- Tweezers (optional) – handy for pulling out a stray bead without tugging the whole chain.
Even if you’re on a plane, a single safety pin from your sewing kit can double as your secret weapon. That’s why we always tell our traveling customers to keep one in the pocket of their carry‑on.
Lay it out flat
Find a clean, flat surface – a wooden desk, a marble countertop, or even a folded towel works. The goal is to stop the chain from sliding while you focus on the knot. Good lighting is a game‑changer; a bright desk lamp or natural sunlight reveals the tiniest twists.
Pro tip from Jewelers Mutual: spreading the necklace on a plain background helps you see the exact point where the metal overlaps, making the “poke‑and‑wiggle” method far more effective.
Identify the main knot
Start at the largest, most visible tangle. Often, the knot forms around a pendant or a clasp. Gently lift the chain with your fingers and see if any links are already loosened – sometimes the solution is as simple as nudging a loose link apart.
Imagine you’re untangling headphones: you first locate the biggest loop, then work inward. The same logic applies here.
Apply a little lubrication
Put a single drop of baby oil onto the knot using a cotton swab. The oil coats the metal, reducing friction without soaking the entire piece. If you’re worried about residue, remember to wash the chain with mild soap and warm water once you’re done.
For chains that are especially delicate, a pinch of baby powder works just as well – it creates a dry, slip‑friendly surface.
Start the gentle “pin‑and‑wiggle”
Insert your safety pin or needle into the heart of the knot. Rotate it in small circles, feeling the tension ease. Don’t yank; think of it as coaxing a shy cat out from under a couch.
Once the knot loosens a bit, use the pin to tease apart individual links. If you have tweezers, grab a stray link and pull it gently away while keeping the rest of the chain supported on the cloth.
Real‑world example
One of our frequent flyers told us about a time her Luxury Turquoise Italian style Necklace got tangled after a long flight. She followed the steps above, using the safety pin from her travel kit and a dab of baby oil. Within five minutes the chain was smooth again, and the turquoise pendant still sparkled like new.
Another client, a busy mom, kept a small sewing kit in her diaper bag. When her necklace knotted during a quick change, she used the paper clip tip and a drop of olive oil from the kitchen – the same simple toolkit that works for anyone on the go.
When you’ve mastered gathering your tools and prepping the chain, the rest of the untangling process becomes almost meditative. It’s less about brute force and more about patient, precise movements – the kind of skill you’ll thank yourself for the next time you’re reaching for that favorite piece.
Now that your workstation is set, you’re ready to move on to actually loosening the knot. Stay tuned for the next step where we break down the “poke‑and‑wiggle” technique in detail.
Step 2: Identify Tangled Areas and Loosen the Knot
Okay, you’ve got your workspace set, your pin and oil ready, and the chain is lying flat. Now comes the part that feels a little like a detective‑work scene: you need to actually locate the knot and start coaxing it apart. Trust me, this is where the magic happens.
Zero in on the trouble spot
First, take a slow breath and look for the densest part of the tangle. It’s usually the spot where the chain loops back on itself or where a pendant sits. If you’re lucky, you’ll see a tiny opening – that’s your foothold.
Ever notice how a knotted headphone cord always has one stubborn loop? The same principle applies. Gently lift the chain with your fingertips and see if any links are already slightly apart. Those tiny gaps are your best friends; they give you a place to slip the pin without tugging the whole piece.
So, what should you do when the knot looks like a solid ball of metal?
Gentle “poke‑and‑wiggle” technique
Grab that fine‑point safety pin and insert the tip into the very centre of the knot. Think of it like nudging a stubborn door shut – you’re not trying to force it open, just giving it a little encouragement.
Rotate the pin in tiny circles. You’ll feel the links start to shift, like a tiny hinge releasing. Once you feel a bit of give, use the pin to separate two links at a time. It’s a slow dance; don’t rush it.
Pro tip: if the knot is especially tight, add a second drop of baby oil on a cotton swab and dab it onto the spot you’re working on. The extra slip makes the metal glide smoother without any scratching.
When oil isn’t enough – a quick soak
Sometimes the oil alone won’t break the tension. That’s when a brief warm‑water soak can work wonders. According to a professional jewelry care guide, immersing the chain in warm, soapy water for a minute or two loosens the metal fibers and reduces friction.
Here’s how to do it safely: fill a bowl with lukewarm water, add a few drops of a gentle, unscented dish soap, and let the necklace sit for 30‑60 seconds. If your piece has pearls or delicate stones, skip the soak – the water can damage them over time.
After the soak, lay the chain back on your towel, pat it dry with a soft cloth, and resume the poke‑and‑wiggle. You’ll often find that the knot has softened enough to slide apart with just a nudge.
Real‑world scenarios
Imagine you’re on a weekend getaway in Rome, and your favorite turquoise necklace gets tangled while you’re unpacking. You pull out the safety pin from your travel kit, add a drop of baby oil, and use the “poke‑and‑wiggle” method. Within a few minutes, the chain is free and the pendant still glimmers against the sunset.
Or think about a busy mom juggling a diaper change and a quick coffee run. She spots a knot in her silver chain, grabs a paper‑clip from her bag, and follows the same steps – a little oil, a gentle twist, and the knot loosens without a single bead missing.
These everyday moments show that the technique works whether you’re in a hotel bathroom or a kitchen counter.
Extra tools for stubborn knots
If the knot refuses to budge, try rolling the chain around a thin straw or a clean pencil. The tension created by the rolled shape helps the links unwind in the right direction. Pull the ends slowly while keeping the knot tight against the straw – it’s like using a lever to amplify your gentle pressure.
Another handy trick is to use a pair of tweezers (if you have them). Slip the tweezers between two stubborn links and pull them apart while stabilizing the rest of the chain with your other hand.
Remember, the goal isn’t to yank; it’s to coax. Patience beats power every time.
So, does this feel doable? Absolutely. You’ve got the tools, the oil, the water, and a clear game plan. All that’s left is a few mindful minutes of careful work, and your necklace will be ready for its next outing.
Once the knot is loosened, give the chain a final gentle stretch to make sure no hidden twists remain. Wipe away any lingering oil with a dry cloth, and you’re good to go – back to wearing, gifting, or packing that beautiful piece.
Step 3: Gentle Untangling Techniques (Video)
Alright, the knot's finally loosened enough that you can actually see the links moving. This is the moment where most people either rush in or, better yet, take a breath and treat the chain like a delicate puzzle.
Why gentle twists beat pulling
When you twist around the knot instead of yanking the ends, you’re basically reducing friction and keeping the metal from bending. As the Ylume guide points out, the secret trio is lubrication, a stable surface, and a slow twist. The oil or mild soap creates a slip‑friendly coating, the cloth stops the chain from sliding, and the gentle rotation lets each link find its way out.
Step‑by‑step gentle untangling
1. Prep your workspace. Lay the chain on a lint‑free cloth on a flat table. If you’re on a hotel nightstand, a silk scarf works just as well. The goal is an anti‑slip surface so you can see every tiny movement.
2. Apply a drop of baby oil or a dab of mild soap. Use a cotton swab to place a tiny amount right on the stubborn spot. You don’t need to soak the whole piece – just enough to let the metal glide.
3. Pick your tools. A smooth‑tipped safety pin, a sewing needle, or even two wooden toothpicks work wonders. The Ylume article recommends smooth toothpicks for those who dread metal tips because they won’t scratch the plating.
4. Insert the tip at the centre of the knot. Think of it like nudging a door open with a fingertip – you’re not forcing it, you’re giving it a gentle invitation. Rotate the tip in tiny circles; you’ll feel the links start to loosen, almost like a tiny hinge giving way.
5. Separate two links at a time. Once you have a little give, use the tip to push two adjacent links apart. Then, with the other hand, hold the surrounding chain steady on the cloth. This “two‑link” method keeps tension even and prevents the rest of the chain from tightening up again.
6. Repeat the twist‑and‑push. Work your way outward from the centre of the knot, slowly expanding the opening. If you hit a stubborn spot, add another micro‑drop of oil and let it sit for a second before continuing.
7. Finish with a gentle stretch. After the knot is free, give the entire chain a light pull from both ends. You’ll notice any hidden twists pop out. Wipe away any residual oil with a dry part of the cloth.
So, does this feel doable? Absolutely. You’ve got a cloth, a drop of oil, and a couple of smooth tools – that’s all the arsenal a savvy traveler needs.
Real‑world travel scenario
Picture this: you just stepped off a train in Paris, and your favourite 45 cm gold‑plated necklace is a tangled mess in your carry‑on. You pull out the safety pin from your mini sewing kit, dab a drop of oil, and follow the gentle twist routine. In under five minutes the chain slides free, and you’re back to strolling along the Seine without a scratch.
Or imagine you’re on a business trip to Tokyo, and a quick coffee break reveals a knot in your silver pendant chain. You don’t have a pin, but you’ve packed two wooden toothpicks from a local souvenir shop. The same principle applies – push, twist, and let the oil do the heavy lifting.
Quick checklist
- Flat, anti‑slip surface (cloth or silk)
- One drop of baby oil or mild soap
- Smooth tip (pin, needle, or wooden toothpick)
- Patience – 2‑10 minutes per knot
Remember, the goal is coaxing, not yanking. As long as you keep the motion slow and the lubrication light, the metal stays intact and the sparkle stays brilliant.
Need a visual refresher? The video that follows demonstrates each of these moves in real time, so you can mirror the motion with confidence.
Step 4: Use Specialized Tools and Accessories
Now that you’ve loosened the knot, the real magic happens when you bring the right tool to the table. Think of it like having a tiny Swiss‑army knife for your jewelry – each piece does one thing, but together they make the job painless.
Why a dedicated tool beats a kitchen fork
Ever tried prying a stubborn link apart with a butter knife? It feels like a mini‑battle and you risk scratching the metal. A smooth‑tipped needle, a wooden skewer, or even a purpose‑built travel pin gives you control without the scrape.
Does it sound overkill? Not at all. The Halstead team swears by a wooden skewer for those tight bundles – it slides into the centre of the knot and lets you push the links apart gently.
Tool #1: The fine‑point safety pin or needle
Grab the tiniest point you have – a safety pin, a sewing needle, or even a paper clip bent into a point. Insert it at the heart of the tangle, then wiggle it in tiny circles. You’re basically giving the chain a tiny nudge, like coaxing a shy cat out from under a chair.
Pro tip: keep the pin angled just enough so it slides between two links without catching the outer ones. This reduces friction and keeps the metal gleaming.
Tool #2: Wooden skewer or bamboo stick
Wooden skewers are cheap, disposable, and surprisingly strong. Slip the thin end into the knot, then use a gentle rocking motion to separate the links. Because wood is softer than metal, it won’t leave marks – perfect for delicate gold‑filled pieces.
If you’re travelling, a disposable bamboo stir‑stick fits right in a carry‑on pouch. It’s the secret weapon many of our jet‑setting clients swear by.
Tool #3: Tiny tweezers or precision pliers
When you’ve isolated a single link that refuses to budge, a pair of fine tweezers can grab it without pulling the rest of the chain. Position one hand on the cloth to stabilise the chain, then use the tweezers to pull the stubborn link outward.
This trick works especially well with bead‑laden necklaces where a single bead can act as a roadblock.
Accessory #1: A travel‑friendly jewelry case
Prevention is half the battle. A dedicated case with individual hooks keeps each necklace separate, so you never have to face a knot in the first place. The Roam Often travel case even includes a tiny silicone grip that holds the pin in place while you work.
Imagine landing in Milan, slipping your case onto the hotel dresser, and opening it to find every chain neatly draped – no panic, no tangled drama.
Putting it together: A quick 3‑step routine
1. Lay the chain on a lint‑free cloth, stabilise it with one hand.
2. Insert a wooden skewer at the centre of the knot, rock it gently while adding a drop of baby oil if the metal feels dry.
3. Switch to a safety pin or tweezers to tease out the individual links, working outward until the whole strand is free.
Sounds doable? Absolutely. Most of the time the skewer does the heavy lifting, and the pin finishes the job.
And remember – patience beats power every time. If the knot resists, pause, add a teeny bit more oil, and let the metal settle before you try again.
When you’ve mastered these specialized tools, untangling a necklace becomes as effortless as unwrapping a gift. No more frantic tugging, no more hidden scratches – just a smooth, sparkling chain ready for your next adventure.

Step 5: Prevent Future Tangles – Care and Storage Tips
And now that you’ve freed the chain, the real win is keeping it from knotting again. A few mindful habits can turn a dreaded “oh‑no” moment into a smooth, everyday routine.
Does the thought of a tangled necklace make you cringe? You’re not alone. We’ve seen jet‑setters lose precious minutes rummaging through a mess just because they tossed their jewellery in a drawer.
Why prevention matters
Every twist you avoid saves the metal from extra wear, and it spares you the mental load of a mini‑rescue mission. Think of it like flossing – a tiny effort now keeps the bigger problem away later.
In our experience, the most common culprits are loose ends that swing around and snag on each other. A little extra care at the end of the day pays off when you unzip your suitcase.
Everyday storage habits
First, give each necklace its own breathing space. A soft, lint‑free pouch (the kind we include with our travel sets) keeps the chain flat and prevents it from looping on itself.
Second, consider hanging delicate pieces on a small hook or a padded jewelry hanger. Gravity does the work, keeping the links separated without you having to think about it.
And if you’re short on space, roll the chain gently around a clean cotton‑twist or a wooden dowel. The coil holds the piece in a relaxed loop, ready to slip on when you need it.
Travel‑friendly tricks
When you’re hopping between airports, a compact travel case with individual compartments is a lifesaver. It’s designed to keep each chain isolated, so even if your bag gets tossed, the necklaces stay untangled.
Don’t forget the silk scarf trick. Slip the chain onto a folded silk scarf, then fold the scarf over the chain and secure with a tiny clip. The smooth fabric acts like a cushion and a barrier.
Got a single‑use safety pin handy? Slip it through the clasp loop and lock the chain in place inside your case. It’s a tiny anchor that stops the piece from shifting around.
Quick care checklist
Before you store, give the chain a quick wipe with a soft, dry cloth to remove any residual oil. A clean surface means less chance of the metal sticking together.
Apply a dab of baby oil only when you’re about to wear the piece – not while it’s stored. Too much moisture can attract dust and encourage tiny rust spots on older metals.
Finally, label your compartments if you have multiple necklaces. A simple “gold” or “silver” tag helps you pull the right one without rummaging.
So, what should you do next? Pick one of these storage ideas that fits your lifestyle, try it for a week, and notice how much smoother your morning routine becomes.
| Storage Method | Best For | Quick Tip |
|---|---|---|
| Individual soft pouch | Everyday wear, delicate chains | Place chain flat, add a tiny tissue to absorb moisture |
| Travel jewelry case with compartments | Frequent flyers, multi‑piece trips | Lock each clasp with a safety pin to prevent movement |
| Silk scarf roll | Quick‑grab pieces, limited luggage space | Fold scarf over chain, secure with a paper clip |
Remember, a little prevention goes a long way. With these simple care and storage habits, you’ll spend more time admiring your jewellery and less time untangling it. Happy travels, and may your chains stay forever smooth.
FAQ
How can I safely untangle a necklace chain without damaging it?
Start by laying the chain on a clean, lint‑free cloth in a well‑lit area. Use a fine‑point safety pin or a smooth needle to gently separate the tightest link, working from the outer edge toward the centre.
Add a single drop of baby oil or a dab of mild soap on a cotton swab to reduce friction, then repeat the pin‑and‑wiggle motion until the knot loosens. Finish by wiping any residue with a dry part of the cloth and give the chain a gentle stretch to check for hidden twists.
What tools should I keep in my travel kit for a quick necklace rescue?
A tiny safety pin or a sewing needle is the most versatile; it fits into any knot without scratching metal. A small bottle of baby oil (or a dab of olive oil) provides the slip you need for stubborn links.
Carry a pair of fine tweezers for pulling out single beads or a stray clasp, and a soft, lint‑free pouch to store the chain after you’ve fixed it. All of these items are lightweight, fit in a passport holder, and can be swapped for a paper clip in a pinch.
Can I use water instead of oil to loosen a tangled necklace?
Warm, soapy water can help when the metal is especially tight, but only if the necklace doesn’t contain porous stones or pearls. Fill a bowl with lukewarm water, add a few drops of gentle dish soap, and submerge the chain for 30‑60 seconds.
The heat expands the metal slightly, while the soap creates a thin film that reduces friction. After soaking, pat the piece dry with a soft cloth, then resume the pin‑and‑wiggle method to finish the untangling.
How often should I clean and lubricate my necklace to prevent knots?
Treat your chain like a favorite pair of shoes – a quick wipe after each wear keeps surface oils from attracting dust that can cause links to stick. If you notice any residue or a slight stiffness, apply a tiny dab of baby oil and spread it with a cotton swab, then buff the piece dry.
For frequent travelers, a weekly check‑up before packing is enough; the extra minute of care saves hours of frustration later.
What’s the best way to store a necklace after I’ve untangled it?
Lay the chain flat in a soft pouch or wrap it in a silk scarf, then place it in a dedicated compartment of a travel jewelry case. If you have multiple pieces, label each pocket with “gold” or “silver” so you can grab the right one without rummaging.
Adding a tiny tissue or a dry cotton ball inside the pouch helps absorb any lingering moisture, keeping the metal from developing tiny rust spots over time.
My necklace has a delicate pendant – will the same untangling methods work?
Yes, but handle the pendant area with extra care. Before you start, secure the pendant by looping a tiny piece of soft thread around its bail so it won’t swing into the knot.
Use a needle or pin to work around the links, never directly on the pendant itself. A single drop of baby oil on the surrounding links is enough; avoid saturating the pendant, especially if it contains pearls or porous gemstones that could be damaged by excess liquid.
Why does my chain keep re‑tying itself even after I store it properly?
Chains love to move, and even a tiny shift can create a new knot when they’re packed too tightly. The key is to give each link a little breathing room.
Use individual pouches, a travel case with separate slots, or roll the chain around a clean cotton tube before placing it in a bag. Adding a small piece of tissue or a dry silica packet inside the pouch absorbs moisture, reducing friction that encourages links to catch on one another.
Conclusion
So there you have it – a calm, step‑by‑step way to figure out how to untangle a necklace chain without a single broken link.
Remember the basics: give the chain a flat, lint‑free stage, add just a drop of baby oil, and let a tiny pin do the heavy lifting. Those tiny tricks turn a panic moment into a quick coffee‑break fix. At Diamond Veneer Travel Jewelry we’ve refined these moves for jet‑setters.
We’ve seen busy travelers roll a cotton tube around a chain, and we’ve watched moms use a paper clip while juggling a diaper change. If it worked for them, it’ll work for you.
Going forward, treat each necklace like a little passport – give it its own space, a soft pouch, maybe a tiny safety pin to keep the clasp from swinging. A few seconds of prevention saves hours of untangling later.
And if you ever find yourself on a long flight with a knot that refuses to budge, pause, add another micro‑drop of oil, and let the metal glide. Patience beats power every time.
Ready to keep your favorite pieces knot‑free? Grab a mini travel kit, tuck a pin and a dab of oil in your handbag, and let the next adventure start with a smooth‑sailing chain.
You’ll thank yourself later.