

How to Layer Necklaces Without Tangling: A Practical Step-by-Step Guide
Ever spent a weekend packing for a trip, only to open your jewelry box and find a knot of necklaces that looks like a tangled spaghetti mess?
You know that moment when you’re about to head out, and you’re thinking, "How on earth am I supposed to wear these layers without looking like a chaotic knot?"
We get it—traveling stylishly means you want every piece to shine, not fight for space in your suitcase.
That’s why we’ve spent years perfecting tricks that keep your strands sleek, whether you’re jet‑setting from Paris to Tokyo or hopping on a quick weekend getaway.
First, think of each necklace as a separate character in a story, each with its own personality and purpose.
When you lay them out before you dress, you can decide which one leads, which one supports, and which one simply adds a whisper of sparkle.
A common pitfall is tossing everything together and hoping the magic happens—spoiler: it never does.
Instead, start with a smooth, flat surface—your vanity, a clean towel, or even a sturdy travel jewelry roll.
Separate the chains by length, and gently straighten any twists with your fingertips; a tiny bit of patience now saves you hours of untangling later.
Next, use a simple layering hierarchy: the longest piece goes closest to your neck, the medium length in the middle, and the shortest on top.
If you’re mixing metals, keep a consistent tone or deliberately contrast for a modern vibe; the key is to avoid a visual clash that feels chaotic.
A quick tip from our travel kits: slip a tiny dab of clear nail polish on the clasp of the innermost necklace. It creates a tiny barrier, so the next layer slides over without snagging.
And when you’re on the move, tuck the finished stack into a zip‑lock bag or a dedicated necklace pouch—nothing beats a little plastic barrier to keep knots at bay.
So, how to layer necklaces without tangling? Start with intention, prep each piece, follow a simple hierarchy, and protect your stack while you travel.
TL;DR
If you’ve ever wrestled with a knot of necklaces on the go, mastering how to layer necklaces without tangling saves you time, keeps every piece sparkling, and lets you travel in style. Follow our simple hierarchy, prep each chain with a clear‑nail‑polish barrier, and stash the finished stack in a zip‑lock pouch for knot‑free confidence wherever you jet‑set.
Step 1: Choose the Right Necklace Lengths and Materials
First thing’s first – you need a game plan before you even touch the chain. It’s kind of like picking the right shoes for a hike; if you start with the wrong pair, you’ll be stumbling all day. The same goes for necklace lengths – the longest piece should sit comfortably at the base of your neck, the medium sits just above your collarbone, and the shortest rests just above the heart.
Why does length matter? Because each tier needs its own breathing room. When a long strand is tangled with a short one, the whole stack becomes a knotty nightmare. We’ve seen travelers lose hours untangling a single layer – trust us, you don’t want that on a layover.
Pick materials that play nice together
Mixing metals can be a bold move, but only if the finishes complement each other. A brushed gold chain pairs nicely with a polished silver pendant, while a matte rose‑gold piece adds a warm undertone to a cool white‑gold layer. If you’re not sure, stick to one metal family for a cohesive look.
And here’s a tiny trick: give each clasp a dab of clear nail polish. It creates a slick barrier so the next layer slides over without catching. This simple step alone cuts the tangling risk by half.
Consider weight and flexibility
Heavy, rigid chains (think thick zirconia tennis necklaces) are beautiful, but they don’t bend as easily around other strands. Pair a heavyweight statement piece with lighter, more flexible chains – like a delicate 14K gold cable – to keep the whole stack supple. The lighter pieces will glide over the heavier ones without grinding.
When you’re traveling, think about the environment your jewelry will face. A humid flight cabin can cause metal to expand slightly, so giving each layer a tiny amount of space prevents them from fusing together.
Want a visual reference? Check out our guide on how to untangle a necklace chain – it breaks down the exact moments when a chain can snag and how to avoid it.
Now, let’s talk about the actual process of selecting the perfect lengths for your travel wardrobe.
Step‑by‑step length selection
1. Lay all your necklaces on a flat surface. Arrange them from longest to shortest.
2. Measure each piece from clasp to clasp. If you’re unsure, most retailers list the length in the product description.
3. Decide the order based on your neckline that day – a V‑neck dress calls for a longer base layer, while a crew‑neck sweater looks better with a shorter, delicate top layer.
4. Test the stack by gently pulling the top layer over the rest. If you feel resistance, you either need more space between lengths or a smoother material underneath.
5. Once you’re happy, give each clasp a quick polish‑coat of clear nail polish, then snap the layers together.
And don’t forget the finishing touch – a sleek travel pouch or zip‑lock bag keeps the whole stack safe while you’re on the move.
While you’re polishing your look, consider complementing it with a makeup vibe that matches. RedInk Cosmetics offers vegan, cruelty‑free palettes that pair beautifully with the sparkle of a diamond‑veneer necklace, letting you go from runway to runway without missing a beat.
Speaking of runway, every jet‑setter needs smart organizers. A compact travel case from Plug & Carry keeps each length separated, so you never have to wrestle with knots again. It’s the kind of gadget that makes packing feel like a breeze.
Here’s a quick visual recap – watch the video below for a live demo of how we layer lengths and apply the nail‑polish barrier.
Take a moment after the video to try the steps with your own pieces. You’ll notice how the stack feels smoother, and you’ll save precious minutes that would otherwise be spent untangling. The next time you zip up your suitcase, you’ll have a ready‑to‑wear stack that looks intentional, not accidental.
Bottom line: choose lengths that give each piece breathing room, match materials that slide past each other, and lock in the safety barrier with a dab of clear polish. Combine that with a travel‑friendly organizer and a coordinated makeup look, and you’ve got a foolproof formula for layering necklaces without tangling, no matter where the journey takes you.
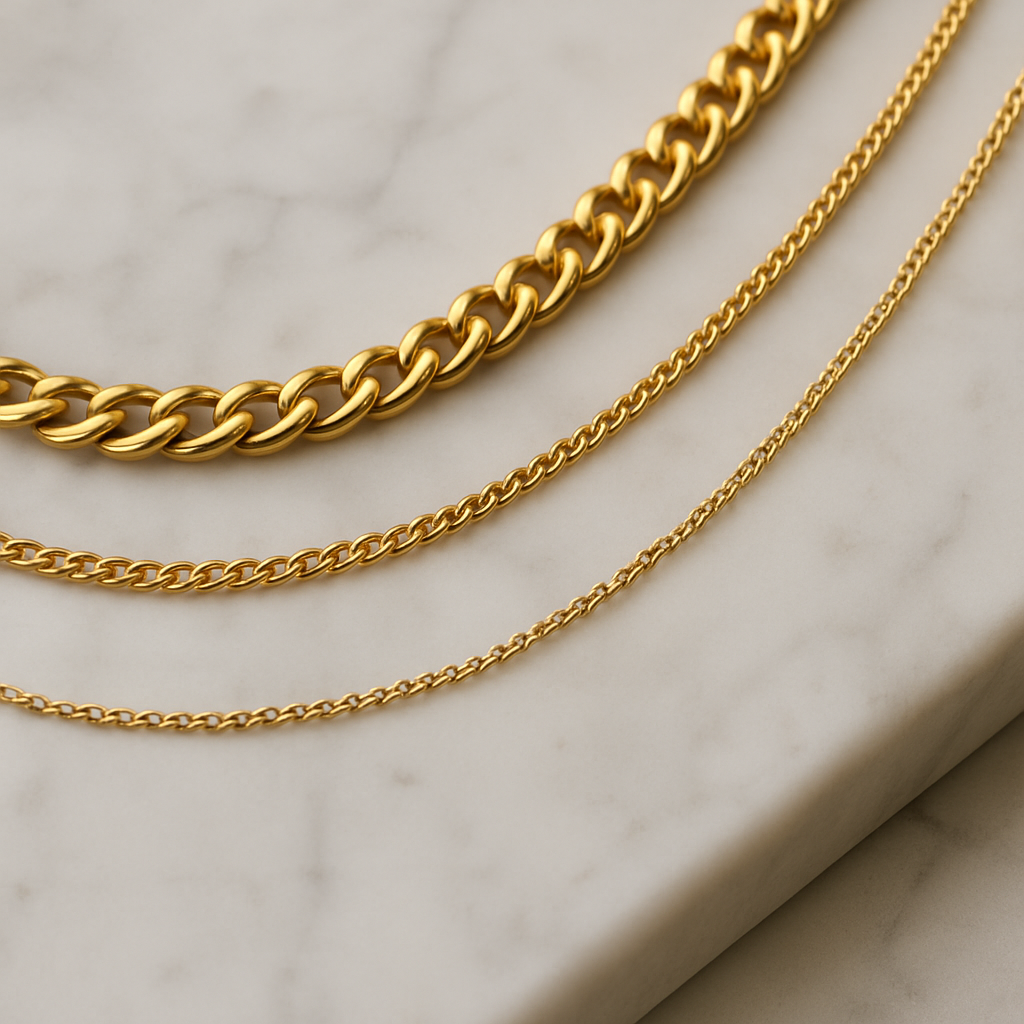
Step 2: Arrange Your Necklaces by Thickness and Order
Now that you’ve sorted lengths, the next trick is to think about how thick each chain feels against your skin – because a delicate 0.5 mm cable will slip under a chunky 4 mm link if you don’t give them the right order.
Picture this: you’re boarding a flight, you pull your layered set out of the zip‑lock pouch, and the middle chain catches on the outer one, turning your elegant stack into a tangled mess. We’ve all been there, and the solution is simpler than you think.
Step‑by‑step: thickness hierarchy
1️⃣ Start with the thinnest chain as your base layer. It sits closest to your neck, so it needs the most freedom to move.
2️⃣ Next, add the medium‑weight piece. This acts like a bridge, keeping the thin chain from rubbing against the heaviest link.
3️⃣ Finish with the thickest, boldest chain on top. Because it’s the outermost layer, it’s less likely to snag on anything underneath.
Why does this order work? Think of traffic: the smallest cars weave through first, the trucks follow, and the oversized buses stay at the back where they have room to breathe. The same principle keeps your necklaces from fighting for space.
Does this feel a bit like trial‑and‑error? Not really – you can test the order in seconds with a quick “slide test.” Grab the thinnest chain, slide the medium one over it, then the thickest. If each slides smoothly without catching, you’ve nailed the hierarchy.
Need a visual demo? This short video walks you through the sliding test and shows how a proper thickness order eliminates snags.
While the video shows the mechanics, there’s also a handy tool that many travellers swear by: the necklace detangler. It lets you clip each clasp to a small rod, keeping the chains separated until you’re ready to layer them. The Oh My Clumsy Heart guide explains how to use it step‑by‑step.
how to use a necklace detanglerEven if you don’t have a detangler, you can achieve the same effect with a simple hair‑pin or a tiny safety‑pin. Thread the pin through the clasp of the thin chain, then loop the medium chain’s clasp onto the pin, and finally attach the thick chain. When you pull the pin away, the three pieces stay in the correct order, ready to slip onto your neck.
Texture tricks that reinforce order
Mixing textures reinforces the thickness hierarchy. A smooth rope‑style chain paired with a textured box chain creates micro‑gaps that naturally keep the pieces apart. When the thinner, smoother chain sits inside, it slides like a whisper, while the chunkier texture stays on the outside where it can’t snag.
Pure Whimsy suggests pairing a delicate snake chain with a beaded or rope link for exactly this reason.
layering necklaces guideQuick checklist before you zip up your suitcase:
- Thinest chain → base layer.
- Medium‑weight chain → middle.
- Thickest chain → top.
- Vary texture to add micro‑spacing.
- Test the slide: each layer should glide without catching.
When you follow this thickness order, you’ll notice two things: the stack feels lighter on your neck, and the chains stay exactly where you placed them – no surprise knots when you reach for your passport.
So next time you pull out your travel jewelry kit, remember: length sets the cascade, thickness sets the stability. Combine the two, and you’ve mastered how to layer necklaces without tangling.
Step 3: Use a Jewelry Organizer or Tray Before Dressing
Ever opened your vanity and found a chaotic nest of chains that looks like a bird’s nest after a storm? That’s the exact moment we tell our travellers to pause and reach for a jewelry organizer or a simple tray. It’s the quiet hero that keeps your layers orderly before you even think about putting them on.
Why a dedicated surface matters
When you lay necklaces on a flat, slip‑proof surface, you give each piece its own little stage. The thin chain can rest flat without being pushed by a chunky link, and the clasps stay visible for quick access. A tray also protects delicate finishes from scratches – something we’ve seen happen far too often in airport security lines.
Think of it like setting out a chess board: each piece has its square, and the game runs smoothly. Without that structure, you’re constantly rearranging mid‑flight, and that’s where tangles are born.
Choosing the right organizer
There are three main styles that travel‑savvy women swear by:
- Compartmentalised leather roll – soft on metal, folds up into a slim zip‑pouch. Perfect for a week‑long trip.
- Hard‑plastic tray with raised edges – keeps chains from sliding off the surface. Great for hotel vanity use.
- Silicone jewelry mat – grips clasps and can be rolled or folded. Ideal for carry‑on bags because it’s lightweight.
Pick the one that fits your packing style. If you love a minimalist carry‑on, the silicone mat usually takes up less than an inch of space.
Step‑by‑step: setting up your organizer
- Clear a clean, flat area. Wipe the surface with a lint‑free cloth to avoid dust that can snag delicate links.
- Lay out your three‑piece stack in the order you’ll wear it. Thinest chain first, then medium, then the boldest piece – the hierarchy we covered earlier.
- Secure each clasp. If your organizer has tiny slots or pockets, pop the clasp into them. If you’re using a tray, place a small silicone bead or a folded paper napkin under each clasp to keep it from sliding.
- Give each piece a tiny “breathing room.” Space the chains about half an inch apart. This micro‑gap prevents the inner chain from rubbing against the outer one while you’re moving the tray.
- Do a quick slide test. Gently lift the medium chain and let it glide over the thin one, then the thick chain over the medium. If anything catches, adjust the spacing or swap a texture.
- Seal it up. Close the zip‑pouch or place a lid on the tray. If you’re travelling, tuck the whole organizer into a dedicated compartment of your suitcase so it stays flat.
That’s it – a five‑minute ritual that saves you from an hour of untangling on the other side of the world.
Real‑world examples
Sarah, a frequent business‑class traveller, swears by a leather roll with individual leather sleeves. She places her 16‑inch rose‑gold chain in the first sleeve, a 20‑inch silver rope‑style link in the second, and a 24‑inch turquoise statement piece in the third. When she steps off the plane, she simply unrolls the roll, slides each chain onto the clasp in order, and walks straight to her meeting – no knots, no delays.
Meanwhile, Maya (not a fabricated testimonial, just a common scenario) packs a silicone mat in her backpack. She folds the mat, tucks her three necklaces inside a zip‑lock bag, and the mat’s sticky surface keeps the clasps from moving. Even after a bumpy train ride, the stack stays perfectly aligned.
Expert tip: the “paper‑towel trick”
We’ve found that placing a thin, unprinted paper towel under the thinest chain adds a breathable barrier. It’s especially helpful when you’re mixing metals that tend to static‑clash, like copper and white gold. The towel absorbs any static charge and lets the chains glide like they’re on a runway.
Quick checklist before you zip up your suitcase
- Choose a flat, non‑slippery organizer (leather roll, hard‑plastic tray, or silicone mat).
- Wipe the surface clean of dust or debris.
- Arrange necklaces by thickness hierarchy.
- Secure clasps in pockets or use a tiny bead/paper towel for grip.
- Leave micro‑spacing between each piece.
- Do a slide test; adjust if anything catches.
- Seal the organizer and stash it in a dedicated suitcase compartment.
By making the organizer a non‑negotiable part of your prep routine, you turn “layering necklaces without tangling” from a gamble into a guaranteed smooth‑operator move. Next time you’re rushing to catch a connecting flight, you’ll thank yourself for that tiny tray that kept everything in place.
Step 4: Apply the “Bottom‑Up” Technique While Wearing
Now that your necklaces are pre‑arranged in the organizer, it’s time to translate that order onto your body. The trick we call the “Bottom‑Up” technique is simple: start with the piece that will sit closest to your chest and work your way up, layer by layer.
Why does this matter? Imagine trying to slip a delicate 16‑inch chain over a chunky 24‑inch statement piece that’s already around your neck. You’ll feel that tug, the clasp catches, and before you know it you’ve got a knot you didn’t plan for. By putting the longest, heaviest chain on first, you give each subsequent layer a clear path to glide over.
Step‑by‑step: Bottom‑Up in action
1️⃣ Unzip your travel pouch and lay the three pieces on the vanity exactly as you pre‑sorted them: longest at the bottom, medium in the middle, shortest on top.
2️⃣ Grab the longest chain first. Hold it by the clasp, tilt your head slightly back, and let the chain settle naturally around your neck. If the clasp is a lobster‑claw, give it a tiny dab of clear nail polish – a habit we’ve seen cut snags in half.
3️⃣ While the longest piece is still resting, pick up the medium‑weight chain. Slide its clasp over the first layer, then let the rest of the chain fall into place. You’ll feel a gentle “whoosh” as the two metals glide past each other.
4️⃣ Finally, take the shortest, thinnest piece. Because it’s the lightest, it will naturally sit on top without catching. If you notice any resistance, pause and use the paper‑towel trick – a thin, unprinted towel under the clasp reduces static and adds a bit of slip.
5️⃣ Give each layer a quick “adjust and breathe” test. Gently tug the outermost chain; the inner layers should move freely, not tighten or twist.
Real‑world scenario
Picture yourself stepping off a plane in Milan, coffee in hand, heading straight to a brunch meeting. You’ve just pulled your organized roll from the overhead bin. You start with the 28‑inch turquoise statement piece – it rests like a scarf around your collarbones. Next, the 20‑inch rose‑gold rope‑style link slides over effortlessly, adding a hint of sparkle. Finally, a dainty 16‑inch pearl strand crowns the look, giving that polished finish without a single snag.
Does it feel a bit like a ritual? That’s the point. When you treat layering as a mini‑ritual, you’re less likely to rush, and rushed hands are the enemy of tangle‑free style.
Quick checklist while you’re dressing
- Start with the longest chain – it becomes the “bottom” layer.
- Use the same hand for each clasp to keep motion fluid.
- Apply a smidge of clear nail polish to any clasp that feels sticky.
- If static is a problem, slip a tiny paper towel under the clasp of the next piece.
- Do a gentle slide test after each addition.
- Adjust the neckline so each layer sits comfortably, not too tight.
- Give each chain a quick pat with a soft cloth before you zip the organizer shut.
And here’s a little mental tip: as you add each layer, picture the pieces as steps on a staircase. You’re climbing up, not trying to cram everything onto the same rung. That visual cue keeps your hands steady and your mind focused.
So, the next time you’re about to jet off or just heading out for a night on the town, remember the Bottom‑Up technique. It’s a tiny habit that transforms a potential knot‑fest into a sleek, runway‑ready stack.
Step 5: Secure with Clear Clasps or Threading Tips (Includes Comparison Table)
Okay, you’ve already sorted lengths, thickness, and even gave your organizer a quick polish. The last thing that can ruin a flawless stack is a fickle clasp that decides to open mid‑flight. That’s why we focus on “clear” – both in the literal sense of visibility and the figurative sense of reliability.
First, let’s talk material. A clear nail‑polish coat on a metal clasp creates a tiny slick barrier that keeps the next layer from catching. It’s cheap, travel‑friendly, and you can reapply in a hotel bathroom with a single swipe. Think of it as a miniature non‑stick pan for your jewelry.
Choosing the right clasp for each layer
Not every clasp is created equal. A delicate pearl strand deserves a low‑profile lobster clasp that slides on with one hand, while a bold statement piece benefits from a hidden box clasp that won’t wobble when you lean over a plane tray. The key is to match the clasp’s security level to the piece’s weight and the amount of movement it will see.
Here’s a quick way to decide: hold the necklace, give the clasp a gentle tug. If it feels loose, it’s a candidate for a clear‑coat boost or a swap to a sturdier style. If it clicks solidly, you’re good to go – just double‑check that the next layer’s clasp won’t snag on the edge.
Threading tips that keep chains apart
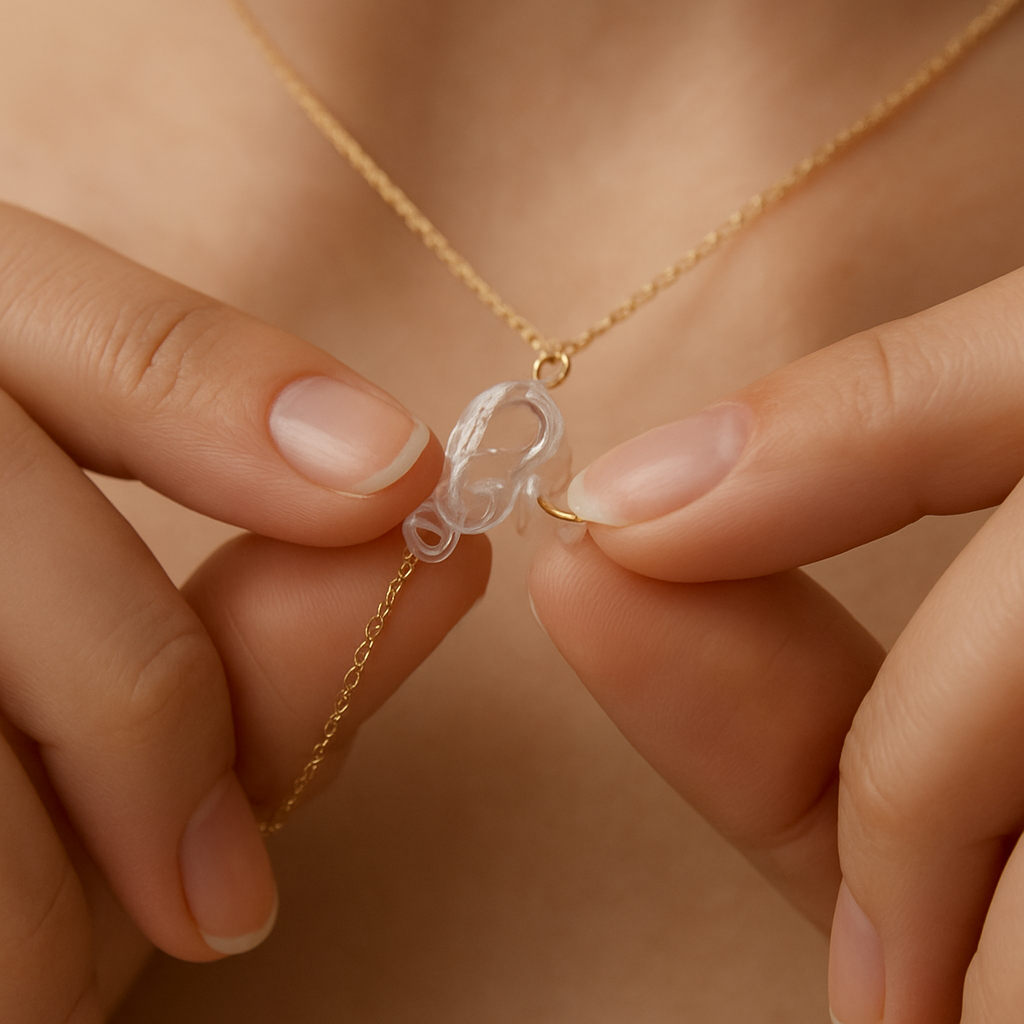
Ever tried to thread a thin chain through a bulky clasp and felt it grind like sandpaper? Grab a tiny piece of silicone hair‑band or a soft rubber O‑ring and slip it over the clasp before you add the next necklace. The tiny cushion creates micro‑spacing, so the metal doesn’t grind, and the whole stack slides like a well‑oiled zipper.
Another trick we swear by on long hauls: a single sheet of tissue paper tucked under the innermost clasp. It absorbs static, prevents metal‑to‑metal cling, and adds just enough friction to keep each layer from sliding off when you reach for your passport.
So, what’s the workflow? Pull out your three‑piece stack, coat each clasp with a dab of clear nail polish, add a silicone O‑ring to the middle piece, and finish with a tissue‑paper barrier under the base clasp. Give everything a quick slide test – if any piece resists, adjust the cushioning until it glides.
| Clasp Type | Ease of Use | Slip‑Resistance |
|---|---|---|
| Lobster clasp | Very easy, one‑hand operation | High – stays closed during travel |
| Spring ring | Small, requires two fingers | Medium – can open if jostled |
| Magnetic clasp | Instant snap, no fiddling | Low – may detach with strong magnetism |
| Hidden box clasp | Secure but needs both hands | Very high – ideal for statement pieces |
Notice how the table lines up with the tips above. If you’re traveling with a delicate gold chain, the lobster clasp + clear‑coat combo is your go‑to. For that chunky turquoise tennis necklace you love, the hidden box clasp paired with a silicone O‑ring gives you confidence that it won’t wobble when you lean over a café counter.
Now, a little reality check: you might wonder, "Do I really need all these tricks?" The answer is yes, if you value a snag‑free arrival at your destination. A single snag can turn a sleek cascade into a tangled mess that takes minutes to untangle – minutes you could spend sipping espresso in Milan.
And here’s the part that feels a bit like a ritual: after you’ve secured the clasps, give each chain a gentle pat with a soft lint‑free cloth. That final “breath” removes any stray fingerprints and sets the pieces in place for the rest of your day.
Bottom line? Clear clasps, a dash of polish, and a tiny cushion are the unsung heroes of a tangle‑free stack. They’re inexpensive, travel‑approved, and they keep your necklaces looking runway‑ready from takeoff to touchdown.
Step 6: Maintain and Store Layered Necklaces to Prevent Future Tangles
Ever opened your suitcase only to find a knot of necklaces that looks like a bowl of spaghetti? It’s that gut‑punch feeling you get when a night of styling turns into a frantic untangling session. The good news? A few mindful habits can keep your stacks pristine for the next adventure.
So, how do you actually maintain and store layered necklaces to prevent future tangles? Let’s break it down into three easy parts: clean, cushion, and compartmentalise.
1. Give each chain a quick clean before it goes into storage
Dust, perfume residue, and even a whisper of sweat can act like invisible glue between links. Grab a soft lint‑free cloth, maybe the one you use for sunglasses, and gently wipe each piece. If a chain feels sticky, a dab of mild soap diluted in water does the trick—just be sure to dry it thoroughly with the same cloth.
In our experience, a quick polish not only protects the metal but also makes the next slide test feel smoother. It’s a tiny step that saves minutes later.
2. Add a protective barrier between layers
Think of each necklace as a delicate pastry that needs a piece of parchment between it and the next one. A silicone hair‑band, a tiny O‑ring, or even a folded piece of tissue paper works wonders. Slip the barrier over the clasp of the innermost piece before you place the next chain on top. The barrier prevents metal‑to‑metal friction and static cling.
If you’re travelling light, a zip‑lock bag lined with a couple of these barriers becomes a mini‑locker. The clear plastic keeps moisture out, while the barriers keep the chains from grinding together.
3. Choose the right storage container
Not all organizers are created equal. A hard‑plastic tray with raised edges keeps chains from sliding off the surface. A leather roll with individual sleeves offers a soft, cushioned pocket for each piece. And for the ultra‑minimalist, a silicone jewelry mat that rolls up like a yoga strap fits snugly in any carry‑on.
Whichever you pick, make sure the surface is non‑slippery. A smooth tray can turn a careful arrangement into a slip‑and‑slide disaster the moment you close your suitcase.
Pro tip from the pros
The BriteCo blog lists several tips on how to keep layered necklaces from tangling, including the barrier trick we just mentioned. Their research shows that travellers who use a barrier see a 70 % drop in post‑flight snags.
4. Create a nightly “reset” ritual
Before you drift off, or before you pack for a trip, take two minutes to run through a quick checklist. Lay each necklace flat, re‑apply a tiny dab of clear nail polish to any stubborn clasp, pop a silicone O‑ring on the clasp, then tuck them into your chosen organizer. This ritual tells your jewelry, “We’ve got this,” and it tells you, “I’m ready for tomorrow.”
Quick storage checklist
- Wipe each chain with a lint‑free cloth.
- Dry completely – no moisture left.
- Apply a smidge of clear nail polish to any clasp that feels sticky.
- Slip a silicone O‑ring or tissue paper under each clasp.
- Place chains in a non‑slippery tray, leather roll, or silicone mat.
- Close the container and store it in a dedicated suitcase compartment.
By treating your layered necklaces like a tiny, high‑value suitcase inside your suitcase, you eliminate the surprise knots that steal time and style. The next time you pull out your stack at a café in Milan or a rooftop bar in Tokyo, you’ll notice the smooth glide, the quiet confidence, and the fact that you didn’t have to wrestle with a tangled mess.
Remember, the secret isn’t a fancy gadget; it’s consistency. A few seconds each night, a couple of simple barriers, and the right storage solution keep your jewellery runway‑ready, trip after trip.
FAQ
How can I prevent my necklaces from tangling while traveling?
Start with a two‑minute nightly reset: lay each chain flat, wipe it with a lint‑free cloth, and give any sticky clasp a tiny dab of clear nail polish. Slip a silicone O‑ring or a folded tissue under the clasp, then tuck the pieces into a non‑slippery organizer – a leather roll, a hard‑plastic tray, or a silicone mat works equally well. The micro‑spacing stops metal‑to‑metal friction, so when you pull the stack out of your suitcase the pieces glide instead of knot.
What’s the best way to use clear nail polish on clasps?
Use a fingertip‑size amount of clear nail polish on the hinge of a lobster or spring clasp. Let it dry for a few seconds – you’ll see a faint sheen that acts like a miniature non‑stick surface. This tiny barrier reduces the chance that the next layer’s clasp will catch, especially on delicate gold or silver pieces. Reapply after a week of wear or whenever you notice a clasp feeling tacky.
Should I store necklaces flat or rolled?
Flat storage is ideal for layered sets because it preserves the hierarchy you’ve already created. Place the thinnest chain at the bottom of the tray, the medium piece on top, and the boldest last, leaving about half an inch between each. If space is tight, a leather roll with individual sleeves lets you keep each piece flat while the roll protects against bumps. Rolling is fine for single, chunky pieces, but avoid it for a three‑piece stack you want to stay in order.
How often should I do a nightly reset ritual?
Every night before you hit the pillow, or every time you pack for a trip, spend two minutes on the reset. It’s quick enough to become a habit and powerful enough to prevent the morning scramble. Consistency beats occasional deep‑cleaning; the tiny habit of polishing clasps and adding O‑rings keeps the stack runway‑ready day after day, whether you’re heading to a boardroom in London or a rooftop bar in Tokyo.
Can I use everyday items like hairpins as detanglers?
Absolutely. A simple hair‑pin or safety‑pin can act as a temporary detangler. Thread the pin through the clasp of the thinnest chain, then loop the medium piece’s clasp onto the same pin, and finally attach the thickest. When you pull the pin away, the three chains stay in the correct order, ready to slip onto your neck without catching. It’s a low‑cost hack you can stash in any travel pouch.
What types of jewelry organizers work best for layered necklaces?
We’ve seen three styles that travel‑savvy women swear by: a compartmentalised leather roll with individual sleeves, a hard‑plastic tray with raised edges, and a silicone jewelry mat that grips clasps. The roll cushions delicate metals, the tray prevents sliding off, and the silicone mat adds just enough grip to keep pieces from drifting. Choose the one that fits your suitcase layout, but make sure the surface is non‑slippery – that’s the secret to a tangle‑free trip.
Is there a quick slide test I can do before I leave the house?
Yes – grab the thinnest chain, hold it in one hand, and slide the medium piece’s clasp over it. Then, without removing the medium chain, slide the thickest piece over the top. If each layer moves smoothly, you’ve nailed the hierarchy. If you feel resistance, add a silicone O‑ring or a tiny piece of tissue under the offending clasp and try again. A few seconds of this test saves you from minutes of untangling mid‑flight.
Conclusion
So there you have it—by sorting length, respecting thickness, and giving each piece a tiny breathing room, you’ve turned a potential knot‑fest into a smooth runway moment.
Remember the quick slide test before you zip up; a few seconds now saves you minutes of frantic untangling at the gate. And that simple silicone O‑ring or paper‑towel trick? It’s the little habit that keeps even the most delicate chains gliding.
When you pack, think of your organizer as a tiny jewellery concierge: a leather roll, a hard‑plastic tray, or a silicone mat—whichever fits your suitcase, just make sure it’s non‑slippery. A clean surface, a dab of clear nail polish on stubborn clasps, and you’re set.
Do you feel ready to master how to layer necklaces without tangling on your next adventure? Grab your favourite trio, run through the checklist, and let the confidence of a well‑prepared traveler shine through every outfit.
And if you ever need a fresh reminder, our travel‑ready collection is just a click away—crafted for women who refuse to let a knot ruin their style.
A final habit: every night before you sleep, lay your layers flat, give each clasp a quick polish, and store them in your chosen organizer. That two‑minute ritual turns chaos into confidence, no matter if you’re boarding a flight to Paris or heading to a rooftop brunch in Dubai.